|
|
||
|
|
||
|
|
||
|
|
||
|
|
![]()
VERY HARD DIFFICULTY - [JUMP TO EASY DIFFICULTY] - [JUMP TO HARD DIFFICULTY]
| Here is our walkthru for the 1983 arcade version of Dragon's Lair by Cinematronics, set at very hard difficulty. (ROM revision F/F2) The 'very hard' game is basically a 'hard' game with the potential for scenes to be randomly replaced by harder versions of other scenes. There are 5 additional scenes that play with a separate, very hard level of programming. They are: Fire Pit (reversed) Flying Barding (reversed) Socker Boppers (reversed) Yellow Brick Road (reversed) Tilting Room To clarify, these are separate, considerably harder versions of these 5 scenes that are waiting in the wings, available to be thrown into play randomly, replacing whichever scene might otherwise be next. The normal hard versions of these 5 scenes are also still in the game in their regular places. During a game, when any scene randomly gets replaced by one of these 5, the replaced scene is permanently removed and will never be played in that game. There is a weighted probability to the random appearance of the 5 very hard scenes; for example, the Tilting Room has a habit of replacing the first scene of the game, while the other 4 do not. Each very hard scene can only appear once in a game; however, the normal hard versions of these scenes can also still appear separately. What makes them very hard is that the timing for some of the moves is abnormal, requiring input much later or earlier than usual and with very short windows of opportunity for success. Whenever they appear, they will look normal at first, and the only way to recognize that the difficulty has been increased is to already be familiar with the game's regular arrangement of all the scenes, and then notice when they are out of place. (Refer to the scene sequencing page for this info.) Whenever a scene appears in a spot where it doesn't usually belong, you can conclude that it's the very hard version of the scene, and play it accordingly as per the guide below. The trouble is, due to the random nature of the insertion of these scenes, sometimes one of them will appear in its regular spot, perhaps even replacing the normal version of itself. In other words, every time that one of the standard scenes from the above list begins to play at its normal hard difficulty in its usual spot, you have to wonder whether it might actually be the very hard version sneaking in (unless you've already previously played the very hard version of that scene and have gotten it out of the way). When the game nears its end, you will replay all* the scenes that you've died on, including the very hard scenes; however, they will no longer be very hard. They will be the normal hard versions of those scenes. * a maximum of 8 This web page only covers the 5 scenes. Refer to the hard difficulty page for how to play the rest of the very hard game. |
LEGEND
| U - | Up |
| D - | Down |
| L - | Left |
| R - | Right |
| S - | Sword |
| N - | No move - (The player does nothing) |
| Moves colored red require particular timing and are only correct when performed at the right time, as explained in their comments. They will cause death if performed too early. Comments colored red warn about moves that have short windows of opportunity. NOTE: All scenes begin with an automatic award of 49 points. |
for the first time, move while the rope is slowing down, but before it stops to change direction. The time window to make this move is 0.23 sec. Or, if you wait until after the ledge recedes, move when the rope comes to a stop, and here you will have 0.27 sec. 89. Move (predictively) at the same instant the next rope appears. The time window to make this move is 0.1 sec. 90. Move (predictively) at the same instant the next rope appears. The time window to make this move is 0.13 sec. 91. Move immediately as the ledge appears. The time window to make this move is 0.27 sec. TOTAL SCORE: 923 |
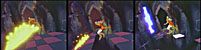
recognized and accepted as a correct move. The time window to make this move is 0.13 sec. 93. Move (predictively) at the same instant the fire appears. The time window to make this move is 0.13 sec. 94. Move immediately as the fire appears. The time window to make this move is 0.2 sec. 95. Move when the wall first appears, while the pillar on the right side is still fully visible. (This pillar is not shown in the picture; the camera has already flown past it, and it is too late to make the move in the picture.) The time window to make this move is 0.3 sec. 96. Move immediately as the fire appears. The time window to make this move is 0.27 sec. TOTAL SCORE: 5,303 |
both socker boppers cross the path together, but each of these time windows is now reduced to as little as 0.23 sec. Alternatively, try moving when Dirk holds his hand forward. 98. Press the Sword button when the Grim Reaper flashes brightly. The time window to make this move is 0.3 sec. 99. The time window to make this move is 0.2 sec. Repeated early attempts to move may be helpful. 100. Move immediately as the door opens. The time window to make this move is 0.2 sec. TOTAL SCORE: 9,231 |
changes and the daggers start flying through the air. The time window to make this move is 0.4 sec. 102. The time window to make this move is 0.27 sec. Repeated early attempts to move may be helpful. 103. This move will be accepted later than usual, at the moment when Dirk is about to jump. (Early attempts will buzz.) 104. The time window to make this move is 0.37 sec., and this window expires immediately as the water snakes appear (sooner than usual). Repeated early attempts to move may be helpful. (It is too late to make the move in the picture.) 105. Move after Dirk steps on the stone that triggers the trap. The time window to make this move is 0.37 sec. 106. Press the Sword button after the spider has appeared. 107. The time window to make this move is 0.37 sec. Repeated early attempts to move may be helpful. 108. Move after the door opens. TOTAL SCORE: 31,462 |
the left closes down over the opening that was created when the stone slid away. The time window to make this move is 0.23 sec. 110. Move immediately after Dirk lands on his feet from jumping straight up. (It is too early to make the move in the picture.) The time window to make this move is 0.1 sec. 111. Move after the door opens, as the exit flashes. TOTAL SCORE: 6,602 |
This guide represents the final Cinematronics ROM revisions F & F2. Earlier ROMs that incorporate these 5 random scenes are not quite as difficult.
Concerning the values specified for time window lengths, be aware that the different Cinematronics PCB revisions have different methods of handling the real-time clock and can produce slightly different results.
The moves on this page that do not have a specified time window length are greater than 0.4 sec (on par with average ranges and not of special concern).
MAXIMUM SCORES (very hard difficulty)
Naturally, the random aspect of the very hard difficulty setting results in unpredictable score fluctuations from game to game.
The appearances of the very hard scenes are not perfectly random with equal chances to appear at every location throughout the game.
Therefore, if, and only if it is possible for these 5 scenes to perfectly replace the 5 lowest scoring scenes of the game, then the maximum possible scores would be as follows.
| Theoretical maximum score using 1 life | 377,011 |
| Theoretical maximum score using 3 lives | 441,513 |
| Theoretical maximum score using 5 lives | 506,015 |
These scores are obtained by allowing both 9-level elevator floors to drop 7 or more levels,
and also by moving 'Up' near the end of the Mudmen scene instead of 'Right',
and also with the improbable fortune of having the very hard scenes appear correctly to replace only the lowest scoring scenes.
The 3-life and 5-life scores are obtained by losing all lives but one at the last sword move of the game.
However, these maximum scores can still be exceeded
quick reference
easy difficulty
|
hard difficulty
|
OTHER DIFFICULTY SELECTIONS
EASY DIFFICULTY
HARD DIFFICULTY
QUESTIONS? COMMENTS?
PROBLEMS?
Contact Us
HOME
| LASER GAMES |
LASER COMMUNITY
| TECH CENTER
This website was created by
Jeff Kinder
& Dave Hallock, 1997 - 2024.
All trademarks and copyrighted materials are property of their respective
owners.